C-Mount Laser Mount with Temperature Stabilization
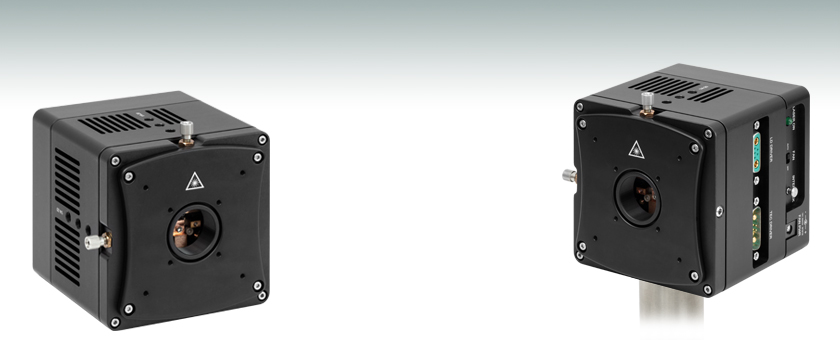
- Laser Mount for C-Mount Semiconductor Lasers
- TEC Cooled with Temperature Stabilization for >20 W of Heat Dissipation
- SM1, 30 mm & 60 mm Cage System, and 1/4"-20 (M6) Post Compatible
LDMC20
Application Idea
LDMC20 with C-Mount Laser and C037TME-E Lens in a S1TM09 Adapter

Please Wait
Click to Enlarge
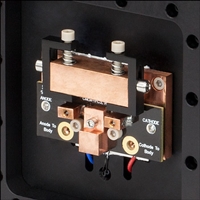
Figure 1: LDMC20's Mounting Platform and Copper Heat Sink
Click to Enlarge
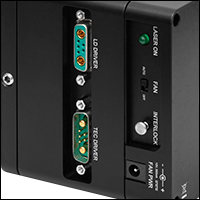
Figure 2: Side View of the LDMC20
Features
- Laser Mount for C-Mount Semiconductor Lasers
- Integrated TEC Element for Active Temperature Control when Used with Our QCL Controllers
- Provides >20 W of Heat Dissipation at 25 °C
- Supports Single-Tab and Dual-Tab C-Mount Laser Configurations (See the Specs Tab for Details)
- 30 mm and 60 mm Cage System Compatible
- SM1 Threaded for Aspheric Lens Adapters, Fiber Adapters, and Ø1" Lens Tubes
- Nine 1/4"-20 (M6) Tapped Holes for Easy Post Mounting
- Includes Current and TEC Cables for QCL Controllers and External Power Supply for Fan
Thorlabs' LDMC20(/M) C-Mount Laser Mount is designed to work with our line of Fabry-Perot (FP) and Distributed Feedback (DFB) C-mount semiconductor lasers. Internal electronics provide active temperature stabilization capable of dissipating heat loads of at least 20 W at 25 °C, making this mount ideal for temperature-controlled operation of C-mount lasers. The C-mount laser is mounted against a copper heat sink and held in place by a cap screw included with the mount (see the Installation tab for assembly instructions). The LDMC20(/M) is compatible with select single-tab and dual-tab laser configurations; please refer to the Specs tab for diagrams of compatible C-mount devices.
A TEC control circuit provides a stable temperature environment for the laser and the mount is air cooled, utilizing an automatic fan speed control to actively cool the heat sink. The fan is vibrationally isolated and designed to run only as needed for temperature stabilization so as to minimize vibrational coupling. When combined with proper current control, the mount can be used to stabilize or tune the laser's wavelength. The fan can be run via an external power supply (included with the mount) if the TEC driver being utilized cannot supply power to the fan.
The laser is held in the mount such that the emission facet is nominally centered in the SM1-threaded (1.035"-40) port. This port is intended for mounting aspheric lenses for collimation purposes, using the proper adapter and lens. Z translation is achieved by rotating the adapter in the SM1 port with a spanner wrench. A pair of knurled knobs provides fine X-Y translation of this port so that the emitted laser beam can be precisely centered within it. This makes centering the laser beam onto collimating optics quick and easy. The translation is accomplished through the utilization of a flexure design. The front cover plate of the LDMC20 is equipped with eight 4-40 tapped holes for our 30 mm or 60 mm cage systems.
Laser protection features include optional grounding configurations, and the TEC Lockout circuit* that prevents enabling the laser unless the TEC controller is active. The built-in thermoelectric cooler enables temperature-controlled operation of the laser diode.
*TEC Lockout only functions with Thorlabs' current and temperature controllers and can be easily bypassed if not required.
Recommended Current and Temperature Controllers
For temperature and current control, we recommend using this mount with the ITC4002QCL or ITC4005QCL dual current and temperature controllers. These controllers are designed with high compliance voltages of 17 V or 20 V, respectively, and maximum operating currents of 2 A or 5 A, respectively, to support our MIR C-mount lasers.
The LDMC20 mount ships with current and TEC cables that are compatible with all of our LDC current controllers and ITC dual current and temperature controllers, including the ITC4002QCL and ITC4005QCL.
Handling C-Mount Lasers
Proper precautions must be taken when handling and using C-mount lasers. Since these lasers are sensitive to electrostatic shock, they should always be handled using standard static-avoidance practices. Additionally, these lasers do not have a built-in monitor photodiode and should be used with a high-quality, constant current driver specifically designed for use with laser diodes.
Unlike TO can and butterfly packages, the laser chip of a C-mount laser is exposed to air; hence, there is no protection for the delicate laser chip. Contamination of the laser facets must be avoided. Do not blow on the laser or expose it to smoke, dust, oils, thermal grease, or adhesive films. The laser facet is particularly sensitive to dust accumulation. Do not use thermal grease with this package, as it can creep, eventually contaminating the laser facet. Acceptable alternatives to thermal grease include pyrolytic graphite and solder.
| LDMC20 Specifications | |
|---|---|
| Supported Laser Diode Packagesa | Single-Tab C-Mount Dual-Tab C-Mount |
| Laser Current (Max) | 20 A |
| TEC Current (Max)b | 11.1 A |
| TEC Voltage (Max) | 14.5 V |
| Heat Dissipation Capacityc | >20 W at 25° C |
| X-Y Translation Range | ±1.0 mm |
| X-Y Translation Resolution | 250 µm/rev |
| Center Threads | SM1 (1.035"-40) Threads 0.535" (13.5 mm) Deep |
| Temperature Sensorsd | 10 kΩ ± 2.2% Thermistor @ 25 °C β = 3984 |
| Operating Temperature |
10 to 40 °C (Non-Condensing) |
| Electrical and Physical Specifications | |
| Laser Interface | 7W2 Mixed Female D-Sub Jack |
| TEC Interface | 7W2 Mixed Male D-Sub Jack |
| Fan Input | 12 VDC, 500 mA |
| Power Supply Connector | 2.1 mm Power Jack |
| Interlock Connector | 2.5 mm Phono Jack |
| Indicators | Green LED when Laser Enabled |
| Size (L × W × D) | 4.00" × 4.00" × 4.05" (101.6 mm × 101.6 mm × 102.9 mm) |
| Weight | 1543 g (3.4 lbs) |

Click to Enlarge
LDMC20 Mechanical Drawing
Supported C-Mount Laser Configurations

Click to Enlarge
Incompatible C-Mount Laser Configurations

Click to Enlarge
Click to Enlarge
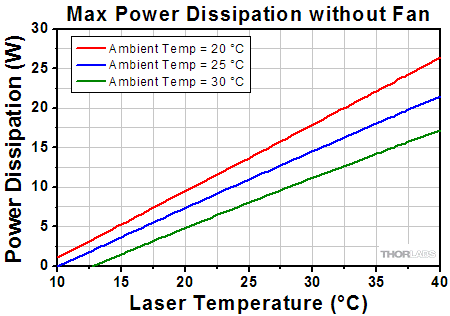
The graph above shows the heat dissipation of the LDMC20 with the fan turned off. Data was taken at three different ambient temperatures.
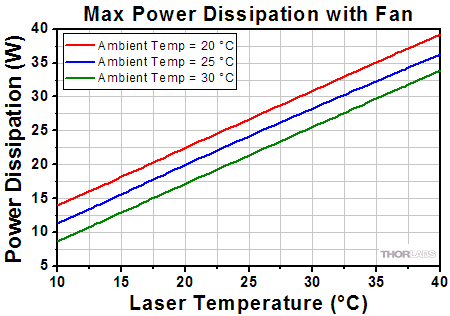
Click to Enlarge
The graph above shows the heat dissipation of the LDMC20 with the fan turned on. Data was taken at three different ambient temperatures.
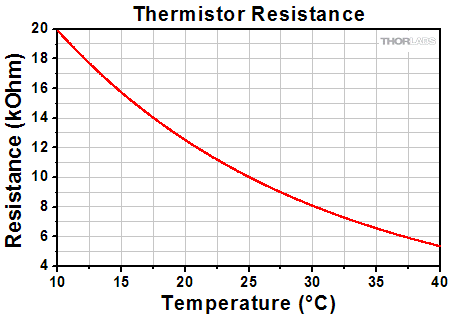
Click to Enlarge
The graph above shows the resistance value of the LDMC20's thermistor as a function of temperature. For this thermistor, β = 3984.
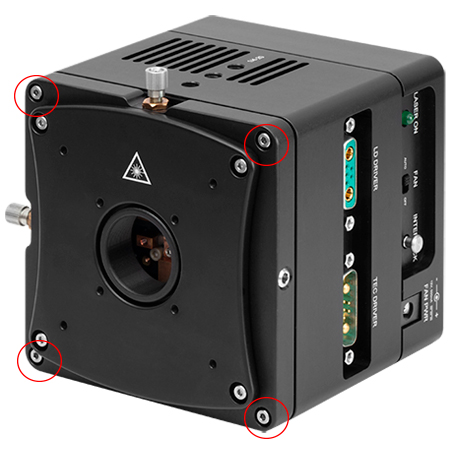
Click to Enlarge
Figure 1: To begin installation, remove the four socket head screws from the corners of the front face using the included 5/64" hex key.
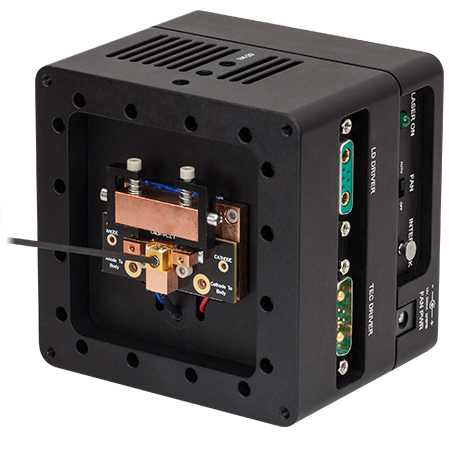
Click to Enlarge
Figure 2: Carefully insert the C-Mount laser into position within the mount. Using a 5/64" balldriver, secure the laser with the 2-56 socket head screw.
Click to Enlarge
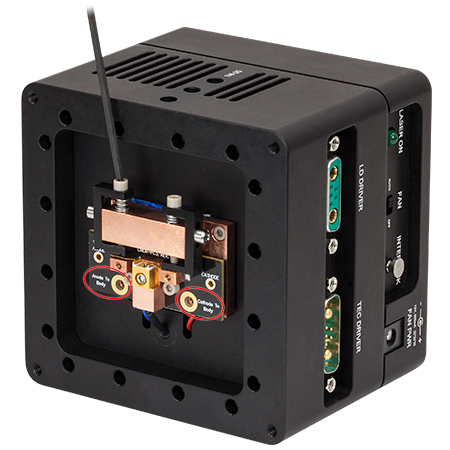
Figure 3: The black plastic brackets seen above are used to ensure proper electrical contact between the C-Mount's tabs and the LDMC20. Using a 3/32" balldriver, tighten the two 4-40 socket head screws until the tabs are held securely against the small copper blocks. These screws only need to be snug. Do not overtighten as it can cause damage to the mount or laser. For single-tab C-Mount lasers, the included 4-40 screw and washer needs to be set into either the "Anode To Body" or "Cathode To Body" location (dependent on laser configuration) indicated by the red circles.
Click to Enlarge
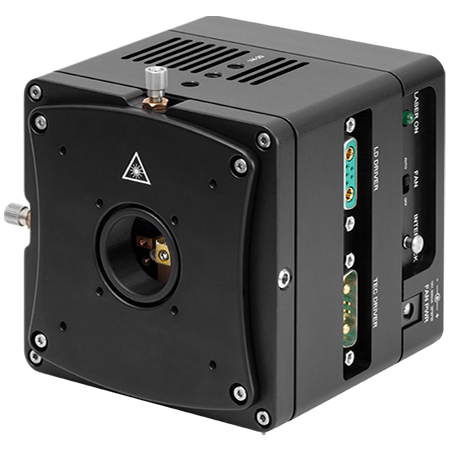
Figure 4: Replace the front face of the mount.
Click to Enlarge
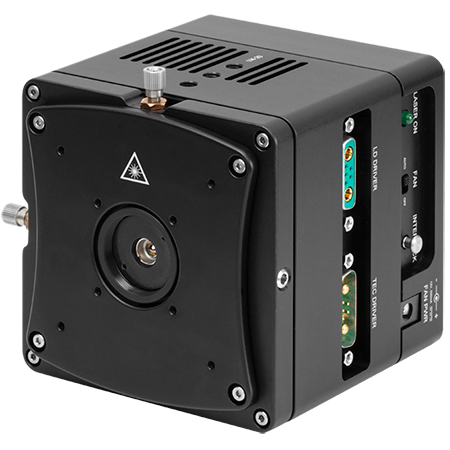
Figure 5: Install the desired lens and adapter. This image shows the LDMC20 with a C037TME-E aspheric lens with an S1TM09 aspheric lens adapter. The SPW909 can be used to insert the adapter into the SM1-threaded port. This port is intended for mounting aspheric lenses for collimation purposes, using the proper adapter and lens. A pair of knurled knobs provides fine XY translation of the port so that the beam can be precisely centered, while Z translation is achieved by rotating the adapter in the SM1 port with the spanner wrench. For optimization in Z, rotate the assembly by 1/4 or 1/2 turn at a time, and then check the beam quality (preferably by using a camera) some distance away from the LDMC20(/M).
Laser Pin Connections
7W2 Mixed Female D-Sub Jack
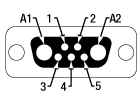
| Pin | Connection | Pin | Connection |
|---|---|---|---|
| A1 | Laser Cathode | 3 | Not Connected |
| A2 | Laser Anode | 4 | Laser Voltage (Anode) |
| 1 | Interlock and Status Return | 5 | Laser Voltage (Cathode) |
| 2 | Interlock and Status Pin |
TEC Pin Connections
7W2 Mixed Male D-Sub Jack
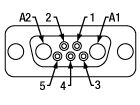
| Pin | Connection | Pin | Connection |
|---|---|---|---|
| A1 | TEC (+) | 3 | Fan Power |
| A2 | TEC (-) | 4 | TEC Lockout (+) |
| 1 | Thermistor (+) | 5 | Ground |
| 2 | Thermistor (-) |
| Posted Comments: | |
user
(posted 2024-12-05 11:48:23.107) Hi. On page 13, Section 5.4. Active Fan Cooling System, I can see that the mount only has the 2 options: 1) Off and 2) Auto. But in Auto mode, the fan switches On and Off every few minutes. Is there a way to set the fan to "Always On" mode? Is this recommended for my QCL that is operates at 0.6 A and has a forward voltage of around 12 V? Thanks! ksosnowski
(posted 2024-12-10 10:31:35.0) Thank you for reaching out to us. The LDMC20 fan only activates when the heatsink surpasses 30C, so depending on the thermal load this may switch on and off periodically, this is normal. Vibrations from fans can potentially disturb optical setups, so our design allows the fan to only activate as needed during Auto mode, or it can remain Off for smaller heat loads. Our Graphs tab above has the max heat dissipation performance plots both with, and without, the fan activated. LDMC20 can dissipate >20W in a 25C environment so your QCL is well within the thermal limits. I have reached out directly to discuss your application in more detail. Sam Rubin
(posted 2023-06-13 15:23:42.55) would be useful to know the distance from the laser diode to the front of the SM1 thread ksosnowski
(posted 2023-06-13 04:09:05.0) Hello Sam, thanks for reaching out to Thorlabs. For LDMC20 we directly specify the mounting surface as 19.4mm deep from the front flange with the optic threads. As different lasers could have different physical dimensions, the laser chip length should be subtracted from this flange depth to get the emitter depth when using this mount. user
(posted 2022-09-14 17:36:57.15) I wonder if it's possible to see the laser diode facet from the top after removing the Taps? Thanks! ksosnowski
(posted 2022-09-22 04:55:05.0) Thanks for reaching out to Thorlabs. The clamp above the diode securing its pins extends 6mm past the face of the PCB, so this would likely block the top of any installed diode. The images from the "Installation" Tab show above the mechanism that would block this, and the mount wouldn't be operable if this were removed. lukas.perner
(posted 2018-06-23 16:17:37.923) Just a remark on the Imperial C-Mount laser mount: Mounting to any base, e.g. kinetic or magnetic, or even a ball-bearing stage, would be a lot easier if the spacing of the outside 1/4"-20 threads on the side would be 1.00" instead of 1.05". Construction-wise this can't be a problem, as the metric ones have a 25.0mm spacing for their respective threads (being M6 on them).
This change would result in a far better compatibility with ThorLabs mountig options as the standard spacing of breadboards, stages, mounts etc. is 1". YLohia
(posted 2018-06-25 12:23:11.0) Hello, thank you for your valuable feedback. I have posted this on our internal engineering forum for further consideration. user
(posted 2018-05-06 15:05:23.557) Does the integrated LDMXY make this product suitable for vertical mounting using the 60 mm cage system or will the weight (heat sink etc.) press the slip plate against the xy-positioner and prevent the latter from being moved with the screws? YLohia
(posted 2018-05-07 04:26:46.0) Hello, thank you for contacting Thorlabs. The integrated LDMXY is suitable for vertical mounting using the cage system. The screws are as adjustable in this configuration as they are in a typical post-mounted configuration. |
 Products Home


 C-Mount LD Mount with TEC Element