 Products Home / Electrical and Shielding Tools and Supplies / 19" Rack Enclosures for Electronic Devices
19" Rack Enclosures for Electronic Devices
- Aluminum Enclosures for 19" Racks
- Mounting Board, Breadboards, and Platform
- Accessories for Benchtop Usage Available
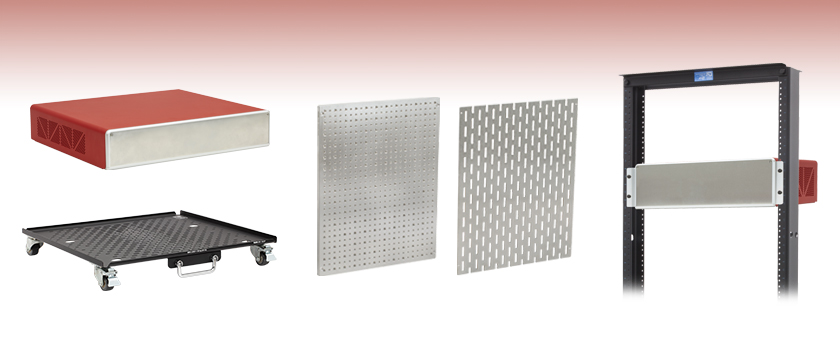
EC2U
19" Rack Enclosure,
482.6 mm x 377.2 mm x 88.4 mm
MSBU3038
Breadboard for EC2U, EC3U, and EC4U;
8-32 and 1/4"-20 Taps
EC3U Enclosure Mounted in 19" Rack
Application Idea
ECUMB
Mounting Board for EC2U, EC3U, and EC4U;
18.0 mm x 5.0 mm Slot Holes
ECCP
Platform for 19" Rack Enclosures


Please Wait
| Enclosure Item # |
Height in Rack Units | Enclosure Dimensionsa (W x D x H) |
|---|---|---|
| EC2U | 2U | 482.6 mm x 377.2 mm x 88.4 mm (19.00" x 14.85" x 3.48") |
| EC3U | 3U | 482.6 mm x 377.2 mm x 132.9 mm (19.00" x 14.85" x 5.23") |
| EC4U | 4U | 482.6 mm x 377.2 mm x 177.4 mm (19.00" x 14.85" x 6.98") |
| EC5U | 5U | 482.6 mm x 377.2 mm x 222.3 mm (19.00" x 14.85" x 8.75") |
| EC6U | 6U | 482.6 mm x 477.2 mm x 266.3 mm (19.00" x 18.79" x 10.48") |
- These dimensions measure the outside of the enclosure, including the mounting brackets. Detailed dimensions of each enclosure are available by clicking on the red Docs icons (
 ) below.
Features
- 5 Sizes of Aluminum Housings Available (See Table to the Right)
- Designed for 19" Equipment Rack
- Aluminum Mounting Board for Mounting Components Inside Enclosures
- Platform for Transporting the Enclosure
- Breadboard for Rack Enclosures
- Accessories for Converting the Enclosures to Benchtop Use
Thorlabs offers enclosure options for customers interested in assembling their own 19" rack-mounted electronic devices. Our enclosures are available with one of five rack unit (U) heights: 2U, 3U, 4U, 5U, or 6U. The front and rear panels of the enclosure are blank; input and output ports can be added by the user depending on the application. Due to their larger size, the EC5U and EC6U enclosures include handles on the sides for easier transportation.
A mounting board or breadboard (sold separately below) can be secured inside the enclosures. The ECUMB mounting board provides a surface with 18 mm x 5 mm slots for assembling electronic components, such as PCBs, development boards, and power supplies. Alternatively, the MSBU3038(/M) breadboard features a high-density hole pattern of 8-32 (M4) and 1/4"-20 (M6) tapped holes to allow optomechanical components to be mounted inside the enclosure. Both the mounting board and breadboard are secured using a 2 mm hex key and the M3 button head cap screws included with the enclosure.
The ECCP Platform with Swivel Casters has four slots for compatibility with the 19" enclosures sold below. The four caps on the base of the 19" enclosures fit into these slots, which prevents the enclosure from sliding around on the platform. The platform has a max load of 105 kg (231 lbs) and comes equipped with four lockable swivel casters and two foldable handles for ease of movement.
The EC2US, EC3US, and EC4US mounting strips may be used to replace the mounting brackets and reduce the profile of the EC2U, EC3U, or EC4U respectively. The ECUF rubber feet may be attached to the enclosures for benchtop usage.
For housings that hold smaller, custom electronic circuits, such as electrical filters, voltage dividers, or impedance matchers, see our compact customizable electronics housings. For housings that are not designed to be mounted in a 19" rack, please view our benchtop customizable electronic housings or our smaller flanged benchtop enclosure.
| Posted Comments: | |
Sanket Shah
(posted 2023-04-19 15:46:18.67) What is the weight limit of EC3U/4U for the stuff that it can hold? Also what is the weight limit for RBX32-BFP/M? cdolbashian
(posted 2023-04-26 09:53:26.0) Thank you for reaching out to us with this inquiry. while we do not have an official spec for the EC** products, we have tested these to be 50lbs for the EC3U and 66lbs for the EC4U. regarding the RBX32-BFP, we provided such load capacity information on the product summary page: 175lbs. Peter Vandenabeele
(posted 2020-06-22 05:47:18.3) Dear sir, dear madame,
When looking at the page of the smaller benchtop enclosures, I see that it is possible to design where holes are cut into the enclosure. It is even possible to print your custom text on it. For the 19" racks, I don't see this option. Is it possible to process in the same way the 19" racks? For my applications, the benchtop racks are too small. If not, how are we supposed to make holes in the aluminium housing (drilling is possible for small ones, but larger holes, like for power supply or fan are not easily drilled in a nice way - at least not by me...
Thanks for your advice.
Peter. YLohia
(posted 2020-06-23 08:38:47.0) Hello, thank you for contacting Thorlabs. Custom products can be requested by emailing techsupport@thorlabs.com. We can provide 19" rack options with holes and custom text. We will reach out to you directly to discuss this further. |

 Zoom
Zoom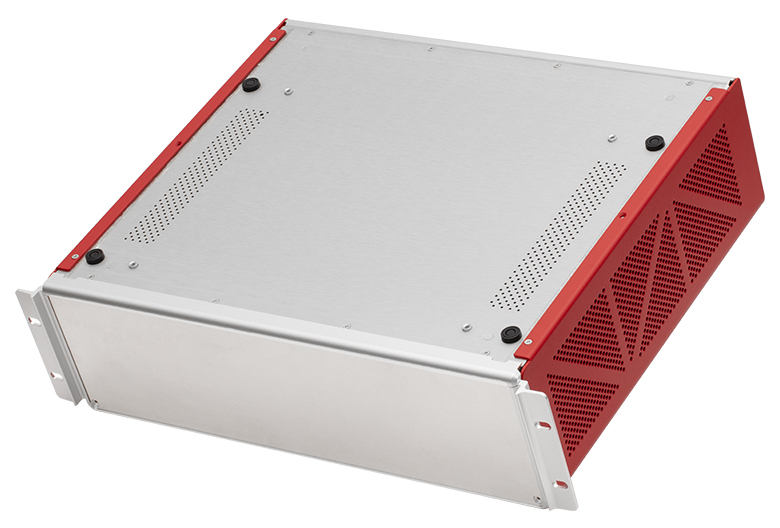
Click to Enlarge
Base of the EC3U Enclosure
Click to Enlarge
Exposed Interior of EC2U
- Empty Housings for Electronic Assemblies
- Designed for 19" Racks
- 2U, 3U, 4U, 5U, and 6U Sizes Available
The aluminum enclosures sold here come with blank front and rear panels, as well as two mounting brackets. The mounting brackets allow these enclosures to be stored in standard 19" equipment racks. A mounting board for the inside of each enclosure can be purchased separately below; compatible breadboards are also sold below. Four M3 button head cap screws are included with the enclosures for securing the mounting board or breadboard inside. Enclosures also come equipped with four caps located on the bottom panel (see photo to the far right). These caps fit into the slots of the ECCP platform sold below, preventing it from sliding during transport. The larger EC5U and EC6U enclosures include handles on the sides to aid in transportation.
To open the enclosure, remove the countersunk screws on both the rear and bottom panels using a 2 mm hex key (included with the EC2U, EC3U, and EC4U), and then slide off the top of the enclosure. Once the enclosure is open, the M3 mounting holes can be used to secure a mounting board or breadboard. The EC2U and EC3U feature four M3 tapped holes for interior mounting, while the EC4U, EC5U, and EC6U have seven. For more information on opening the enclosure, please refer to the Spec Sheet, accessed via the red Docs icon ( ).
).

 Zoom
Zoom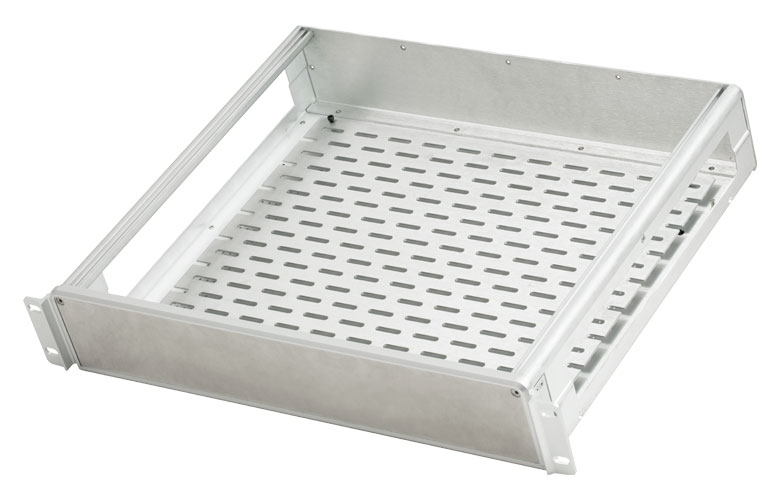
Click to Enlarge
EC2U with Housing Removed and ECUMB Mounting Board Installed
- 380.0 mm x 300.0 mm x 2.0 mm
- 18.0 mm x 5.0 mm Slot Holes for Mounting Electronics
- 1.6 mm (0.06") Thru Holes for Securing to an Enclosure
The ECUMB mounting board provides a surface for assembling electronic components such as PCBs, development boards, and power supplies. This mounting board is designed to fit the EC2U, EC3U, EC4U, EC5U, and EC6U Enclosures. The mounting board is 2 mm thick and sits 6 mm above the bottom of the enclosures when mounted inside.
Once the top of the enclosure is removed, the mounting board can be secured inside the enclosure using the M3 button head cap screws (included with enclosure) and a 2 mm hex key (included with the EC2U, EC3U, and EC4U). Please note that the EC2U and EC3U feature four M3 tapped holes for interior mounting, while the EC4U, EC5U, and EC6U have seven; the three additional M3 taps (cap screws not included) in the center of these enclosures are provided for additional stability.

 Zoom
Zoom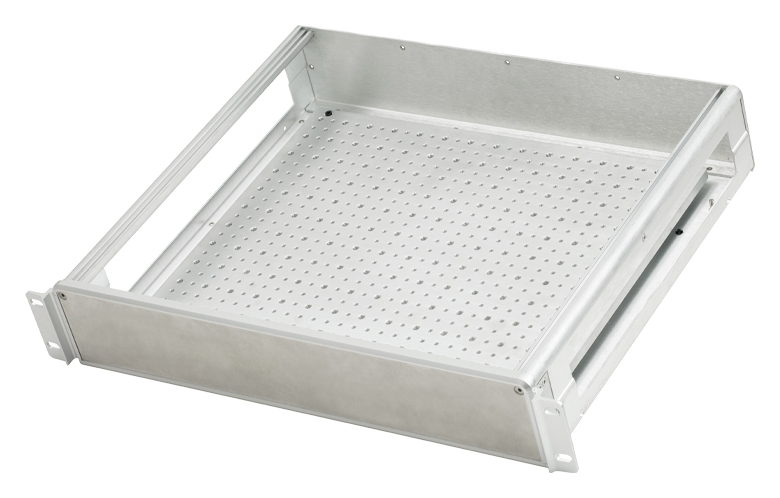
Click to Enlarge
MSBU3038 Breadboard Inside EC2U Enclosure
- 15.00" x 11.98" x 0.37" (375.4 mm x 304.3 mm x 9.5 mm)
- 8-32 (M4) and 1/4"-20 (M6) Taps for Mounting
- Four M3 Counterbored Holes for Securing to an Enclosure
The MSBU3038(/M) breadboards are available to fit inside the 19" rack enclosures sold above. These breadboards allow the user to add and remove optomechanical components within the enclosures easily and securely.
The MSBU3038(/M) hole patterns consist of 8-32 (M4 x 0.7) and 1/4"-20 (M6 x 1.0) through-tapped holes, in the same layout as our Mini-Series breadboards. Four counterbored M3 mounting holes are used to secure the breadboard to the mounting studs inside the enclosures.
When a breadboard is mounted inside of an enclosure, the available height between the top of the enclosure and the top surface of the breadboard will be 23.9 mm less than the overall height of the enclosure. For example, the top of the enclosure is 64.5 mm above the top of the breadboard when mounted in the EC2U and 242.4 mm above the top of the breadboard when mounted in the EC6U. The bottom of the breadboard is 6 mm above the bottom of the enclosure in all cases.

 Zoom
Zoom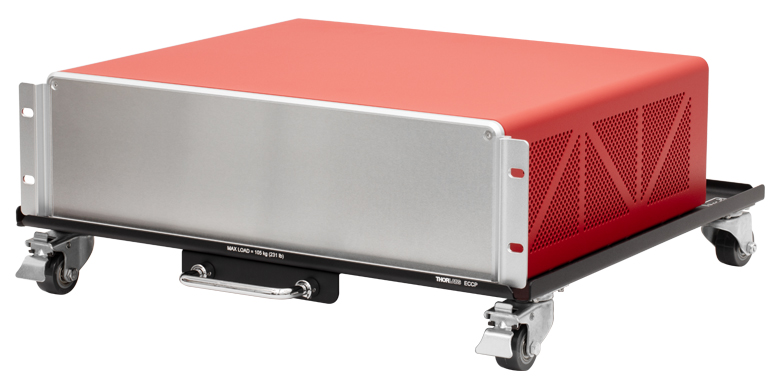
Click to Enlarge
EC3U Enclosure Mounted on the ECCP Platform
- Platform with Foldable Handles and Lockable Wheels for Ease of Movement
- 492.0 mm x 443.0 mm x 75.0 mm (19.37" x 17.44" x 2.95")
- Four Slots for Compatibility with the 19" Rack Enclosures
- Max Load: 105 kg (231 lbs)
The ECCP Platform with Swivel Casters provides an easy way to move the 19" rack enclosures above, which can be used to house heavy components. The platform has two foldable handles, 38 mm swivel casters, and a maximum load of 105 kg (231 lbs).
Four caps on the bottom of the enclosure fit into four slots in the platform surface, preventing the enclosure from sliding during transport. The other slots on the platform are series of vent holes in a variety of sizes. These slots dissipate heat and distribute the weight of the enclosure, making it easier to transport.

 Zoom
Zoom
Click to Enlarge
EC2U Enclosure with ECUF Rubber Feet and EC2US Plates Installed
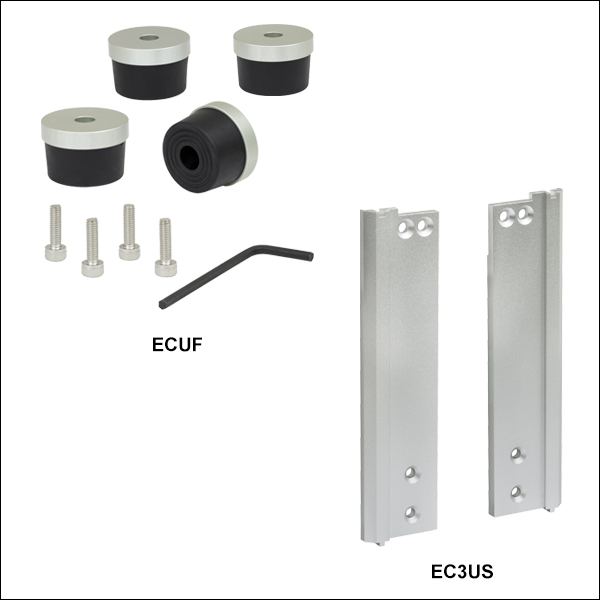
- ECUF Rubber Feet for Benchtop Usage
- EC2US, EC3US, and EC4US Plates to Replace Mounting Brackets
Accessories are available to convert the above rack enclosures into enclosures that are more suited for benchtop use. The EC2US, EC3US, and EC4US plates can replace the mounting brackets of the EC2U, EC3U, and EC4U respectively, and reduce their profile. To install them, remove the countersunk screws on the rear and bottom panels of the EC2U, EC3U, or EC4U to remove the top of the enclosure. Remove the M3 screws that secure the mounting brackets to the enclosure chassis and use the M3 screws to secure the EC2U, EC3U, or EC4U to the chassis.
The ECUF rubber feet can be installed on the bottom of the EC2U, EC3U, EC4U, EC5U, or EC6U enclosures. The included M4-14 cap screws and 3 mm hex key fasten the rubber feet to the M4 screw holes located on the bottom of the enclosure.
For more information on attaching accessories to the enclosures, please refer to the Spec Sheets, accessed via the red Docs icon ().